
In Prince Rupert, the rain does not test a building once a year. It tests it every week. That is exactly why splitting a roof replacement, re-cladding and new windows into three separate jobs costs more: each trade stops at the edge of its own scope, and the flashing, transitions and drainage paths between them get patched over, buried under new cladding, or paid for twice.
This how-to sets out the alternative. It treats roof, siding and windows as one envelope project, sequenced so every transition is detailed once, as a drainage path rather than a seal. You will read why three separate jobs create the seams you pay for twice; what to confirm before anything comes off; the phasing order, what comes off and goes on, in sequence; drying-in and keeping the envelope watertight between phases; weather windows in the Prince Rupert rain belt; working around an occupied home; where code and building science fit into the sequence; choosing and coordinating contractors; and what to do next.
Bulk water control ranks first among the layers that keep a wood-frame wall dry, and the 4 D’s (Deflect, Drain, Dry, Durability) give the sequencing its vocabulary. For J & J Construction, that logic shapes envelope work across Prince Rupert, Port Edward, Terrace and Kitimat.
Why Three Separate Jobs Create the Seams You Pay For Twice
Roof, cladding and windows all terminate against the same walls. Roof-to-wall junctions and every window and door opening are where bulk water gets in, and building scientists rank rain and bulk water control as the most important layer of the assembly (BOABC lunch-and-learn, August 21, 2025). Building envelope failures in Northern BC usually start at the seams, not the surface, and a split scope multiplies those seams.
Split the work and the transitions become other people’s decisions. Re-roof first and side second, and the siding crew inherits a flashing it did not install and has to keep, cut or cover it. The window crew then works around two sets of earlier choices. Each separate contract also pays its own mobilization, staging, scaffolding, disposal and supervision, so the same wall is set up and torn down more than once.
Air leakage can move roughly 100 times more moisture than diffusion, according to the same presentation, which cites no primary study. One continuous air and water barrier across roof, wall and window details still outperforms careful caulking by three different crews.
One scope with one sequence means each transition is detailed once, inspected while it can still be seen, and covered by one warranty instead of three.
What to Confirm Before Anything Comes Off
Before anything is removed, settle six items in writing.
Permits. Confirm with the City of Prince Rupert whether roof, cladding and window replacement can be submitted as one envelope application, and what drawings or schedules that submission requires.
Code basis. The governing document is the British Columbia Building Code 2024, in effect since March 8, 2024, adopting Divisions A to C of the National Building Code 2020 with BC changes. Verify Part 9 Section 9.27 cladding wording against that edition; older extracts, including the 2012 text, predate it.
One scope drawing. Ask for a written scope naming every transition to be detailed: roof-to-wall, window head and sill, door thresholds, deck and porch junctions, penetrations, and cladding-to-foundation.
Material lead times. Lock in window units, cladding profiles and flashing stock before demolition starts. A delayed window leaves an open hole in a partly finished wall.
Moisture and air barrier plan. Put in writing which membrane or coating goes where, how laps are made, and which trade installs each layer.
Occupancy plan. Agree which rooms stay usable when, where the household sleeps during window swaps, and how heat is maintained through the shoulder season. That staged thinking mirrors the planning behind a custom build in Northern BC, where each stage closes before the next opens.
Once these are confirmed, the removal and rebuild order can be set.
The Phasing Order: What Comes Off and Goes On, In Sequence
With permits, drawings and a written moisture plan settled, the sequence is straightforward: every layer is finished before the layer covering it begins.
- Strip and inspect. Open one zone at a time, a single elevation or roof plane, so sheathing, framing and rot are visible together. Photograph and record conditions before anything is covered.
- Roof and roof flashings. Complete the covering, underlayment and roof-to-wall flashings before wall work starts; when that portion is hired out, work through a roofing contractor checklist first. Water runs downhill, so the upper layer laps over lower wall details.
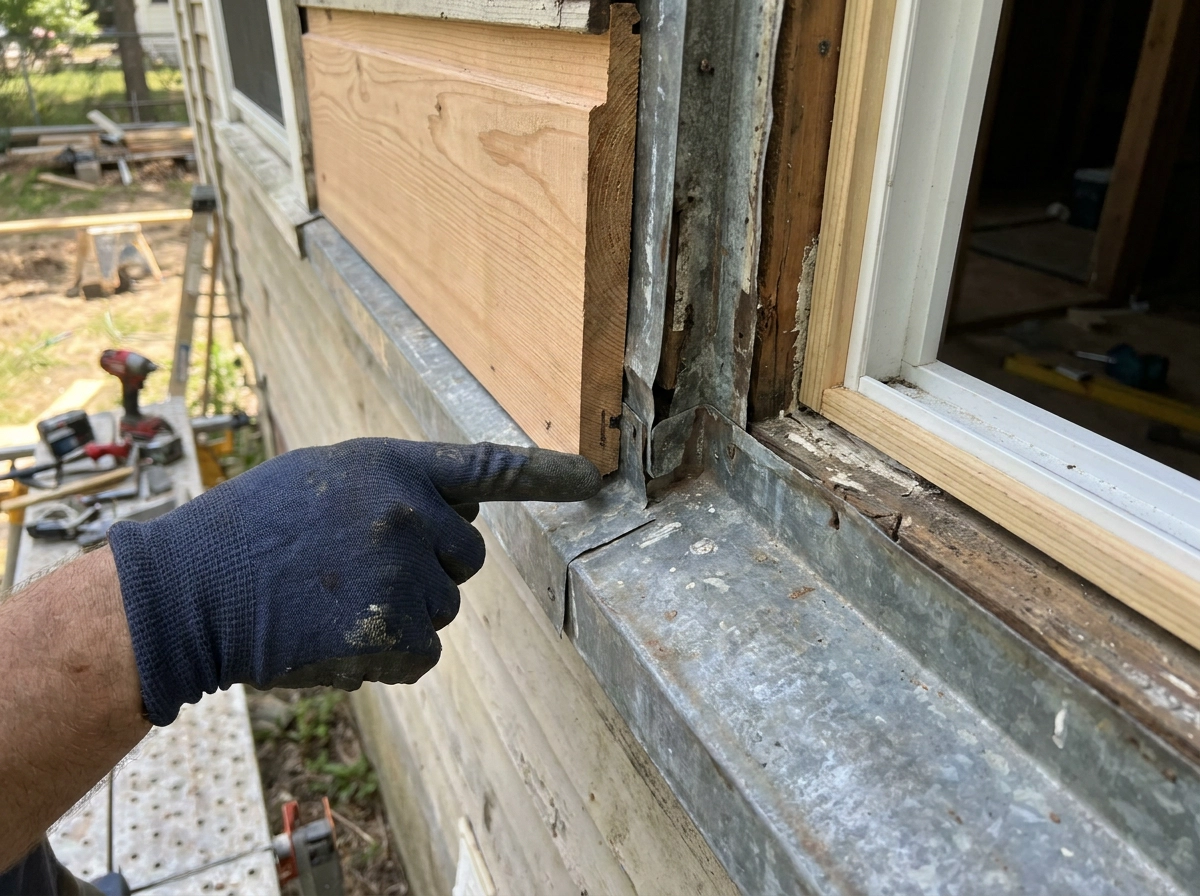
- Windows and doors. Prepare rough openings, then set units on a sill pan or sloped sill with head flashing, taped and lapped into the wall membrane before cladding arrives. Pan flashing at exterior openings must be sealed or sloped to drain to the wall surface.
- Wall membrane and transitions. Install the weather-resistive barrier and detail every tape, liquid and flashing transition so the drainage plane laps over window and door flashings and is ready for cladding.
- Cladding. Install replacement siding or vinyl siding over the finished drainage plane, keeping the manufacturer’s clearances at roof intersections, flashings and penetrations so the wall can drain and dry.
- Close-out. Trim, sealants, vents, penetration collars and site clean-up belong in the same scope, so nothing is left for the owner to chase.
Each trade should hand off a completed layer, not an unfinished one.
Drying-In: Keeping the Envelope Watertight Between Phases
Drying-in isn’t a reaction to a bad forecast. It is the working standard: the assembly should shed water at the end of every working day, not merely at handover. That means limiting the open area. Strip one elevation or one roof plane at a time, and set a maximum open area per day in the schedule so no wall is left bare overnight.
Keep temporary materials staged and ready: tarps, housewrap, cap flashing, tapes, and plywood closures cut to the window and door sizes on the drawing. Waiting on a tarp is the same as having none.
Hold points belong in the schedule. Flashings, sill pans and the wall membrane get inspected while they are still visible. Once cladding goes on, that detail cannot be seen again without removing it. The same discipline that governs concrete work on a commercial project applies here: no trade proceeds over a layer nobody has signed off.
Write the drying-in plan into the contract: a named owner, a trigger for rain in the forecast, and the authority to stop cladding when a layer isn’t ready.
With the sequence fixed and drying-in written into the schedule, the next constraint is the weather itself.
Weather Windows in the Prince Rupert Rain Belt
A drying-in plan only holds if the calendar gives it room. Prince Rupert ranks among the wettest places in Canada, and wind-driven rain wets walls from directions a simple rain shadow will not screen. Plan the sequence assuming water arrives mid-project.
Set work windows from local records and live forecasts. Environment and Climate Change Canada climate normals and ClimateData.ca show which weeks carry the heaviest precipitation; carry contingency through the wettest stretches instead of a fixed finish date.
Design for a wetter future as well. The 2025 National Building Code is the first to incorporate future climatic design values for heat, cold, wind, snow and rainfall rather than historical observations alone. ClimateData.ca expects buildings constructed today to perform for 50 to 100 years, so redundancy in the water management system pays back over decades, not seasons.
Then place the work: sequence the most exposed elevations and roof planes into the drier stretches, and hold cladding on those elevations when wind-driven rain is forecast. That scope decision starts behind the siding, as Siding Replacement in Coastal BC: What the Scope Must Include sets out.
Working Around an Occupied Home
Once weather windows are set, the household still has to live through them. Replace windows one elevation at a time so rooms on that side can be closed up and reheated before the next side is opened. Allow one to two working days per opening from removal to temporary or final closure. Lay floor protection, control dust at the source, and clean daily so living space stays usable. Agree on one point of contact, a published schedule, and consistent updates so the household knows what is happening each day. J & J Construction delivers residential and commercial projects with clear scopes, organized project delivery, and consistent communication; what a home renovation contractor actually manages on a Northern BC project explains the coordination behind that. Stage materials, bins, and lifts so driveways, sidewalks, and entries stay usable, and confirm where waste will sit before the first truck arrives. Plan for pets, sleeping arrangements, and shoulder-season heating, and confirm which interior finishes or blinds will be disturbed when windows are swapped. Those details belong in the same written scope as the envelope sequencing.
Where Code and Building Science Fit Into the Sequence
Building science sets the order. Bulk water control comes first: the BOABC lunch-and-learn presentation of August 21, 2025 places roofing, cladding, sealants, windows, doors, trim and flashings in one water management system tuned to climate zone and building type.
The 4 D’s supply the ordering vocabulary: Deflect, Drain, Dry, Durability. Flashings, gaps and weeps are drainage paths for water that gets past the cladding, so detail each transition as a path, not just a seal.
Cladding is regulated. Part 9 Section 9.27 of the BC Building Code covers vinyl, aluminum, steel and other claddings on wood-frame walls exposed to precipitation, requiring compliance with Subsections 9.27.2 to 9.27.13 or Part 5. Verify against the 2024 edition, not older extracts.
A capillary break behind cladding was proposed for coastal Part 9 buildings in a November 2004 BC Building Policy Branch discussion paper: a 10 mm drained and vented air space, with drainage material at least 80 per cent open in cross-section. That paper is background only, not current law. How the Review Should Be Carried Out covers the process.
Product approvals, installation instructions and warranty terms attach to the same installed details, so compare the code basis, the manufacturer’s detail and the built assembly before work starts.
Choosing and Coordinating Contractors for the Work
Code compliance and building science only hold if one party owns the details.
A search for a roofing contractor near you usually returns one-trade crews. Ask who owns the roof-to-wall flashing when that wall is also getting new windows and cladding.
For replacement siding or vinyl siding installation, ask what drainage detail sits behind the cladding. A rainscreen gap, a continuous drained plane and correctly lapped flashings matter more than which profile you pick.
One contractor holding roofing, windows and cladding under a single scope owns every transition between them. J & J Construction is a family-owned general contractor based in Prince Rupert with nearly 50 years of local experience, serving Port Edward, Terrace and Kitimat. Its building envelope scope covers roofing, siding and windows and doors. That coordination layer is the management function described in what a home addition contractor actually manages.
Confirm licensing and insurance, and insist on a written scope, schedule and hold points in the contract rather than a verbal sequence agreed on site.
Where separate trades must be used, define interfaces in writing anyway: who supplies and installs each flashing, who inspects it, and what happens when the next trade arrives to find it wrong.
What to Do Next
If the roof, siding or windows are due within a few years of each other, group them. One envelope project with one scope and one sequence is usually cheaper and better detailed than three overlapping jobs, because each transition is flashed once.
Put the order in writing: strip and inspect, roof and roof flashings, windows and doors with sill and head details, wall membrane and transitions, then cladding. Require a drying-in plan, forecast-based weather windows and hold points before any layer is covered.
Before ordering materials, check the current 2024 BC Building Code and the manufacturer’s details. Confirm the permit route with the City of Prince Rupert early, including whether roof, siding and windows can be one envelope application.
For one scope and one schedule for roofing, siding and windows in Prince Rupert, Port Edward, Terrace or Kitimat, contact J & J Construction.
Conclusion
Grouping roof, siding and windows into one envelope project gives you one scope, one sequence and one set of flashed transitions. A written order, strip and inspect, roof and flashings, windows and doors, wall membrane, then cladding, keeps water out between phases. Confirm licensing, insurance, drying-in plans, weather windows and hold points before layers are covered. Check the 2024 BC Building Code and manufacturer details, and confirm the permit route with the City of Prince Rupert early. The value is fewer seams, clearer accountability and fewer costly overlaps. Your next step: put that sequence in the contract and contact J & J Construction for one scope and one schedule for roofing, siding and windows in Prince Rupert, Port Edward, Terrace or Kitimat.